หลังจากที่ผู้เรียนได้เรียนรู้การใช้งาน UI มาแล้วในหน่วยการเรียนรู้นี้จะเป็นการเตรียมความพร้อมสำหรับการสร้างสื่อการสอนเบื้องต้น โดยจะเป็นการฝึกการเรียกใช้ไฟล์รูปภาพและเสียง รวมไปถึงการคำนวณคะแนนที่ไม่ซับซ้อน และการเรียกใช้งานหน้าจอถัดไป ในรูปแบบของแบบฝึกหัด หลังจากที่ผู้เรียนได้เรียนรู้การใช้งาน UI มาแล้วในหน่วยการเรียนรู้นี้จะเป็นการเตรียมความพร้อมสำหรับการสร้างสื่อการสอนเบื้องต้น โดยจะเป็นการฝึกการเรียกใช้ไฟล์รูปภาพและเสียง รวมไปถึงการคำนวณคะแนนที่ไม่ซับซ้อน และการเรียกใช้งานหน้าจอถัดไป ในรูปแบบของแบบฝึกหัด

1.เตรียมไฟล์ต่างๆ ให้พร้อม เช่น รูปภาพ ไฟล์เสียง
2.เริ่มต้นการสร้าง project
3.นำเข้าไฟล์เสียง
4. เริ่มต้นสร้าง UI
5.เปลี่ยน Icon
6.พัฒนาโปรแกรมส่วนเชื่อต่อ
7. ทดสอบการทำงานของโปรแกรมผ่านโทรศัพท์จำลอง

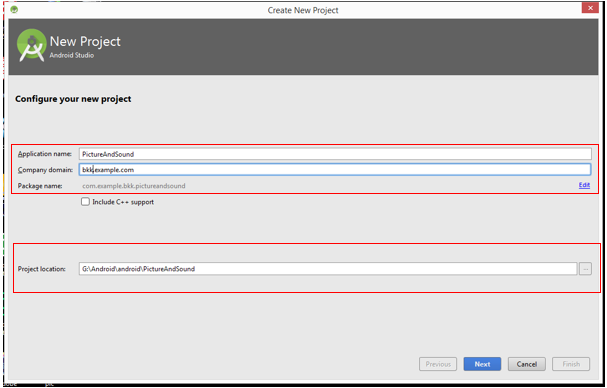
1. เริ่มคลิกที่ new project ตั้งค่ารายละเอียดของโปรแกรมดังรูป แล้วคลิกที่ปุ่ม Next
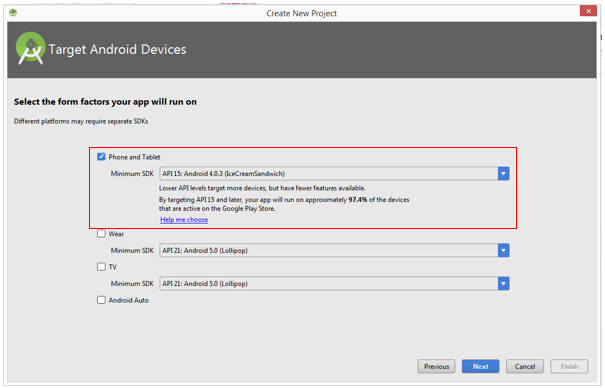
2. ตั้งค่า Minimum SDK เป็น API 15: Android 4.0.3(IceCreamSandwich) แล้วคลิกที่ปุ่ม Next
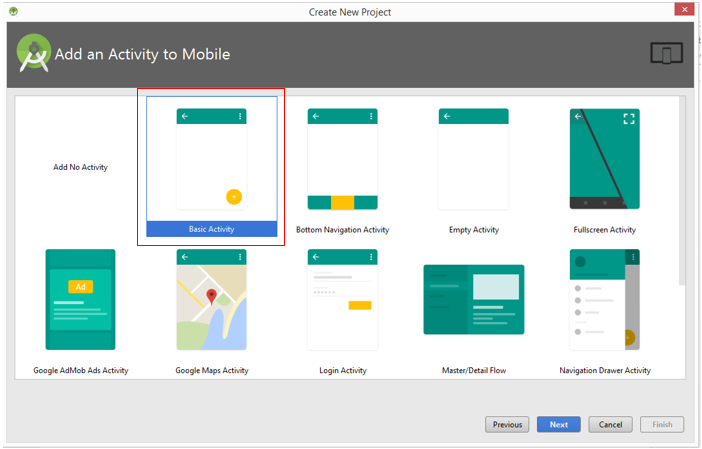
3. เลือก Basic Activity แล้วคลิกที่ปุ่ม Next
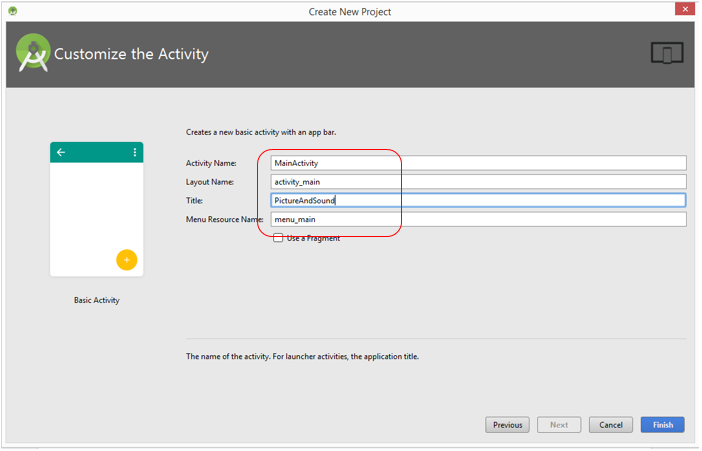
4. ให้ตั้งค่า Option ต่างๆ แล้วคลิกปุ่ม Finish
5. แสดงหน้าแอพพลิเคชั่น


ก่อนที่จะสร้าง UI หรือการพัฒนาส่วนเชื่อมต่อ จะเป็นนำเข้าไฟล์รูปพาพที่จำเป็นต่อโปรแกรม โดยมีขั้นตอนต่างๆ ดังต่อไปนี้
1. ไปยังที่เก็บรูปในคอมพิวเตอร์จากนั้นทำการคัดลอกรูปทั้งหมดที่เตรียมไว้
2. แล้วไปที่โปรแกรม ที่ Project เลือก app > res คลิกขวาตรง drawable เลือกคำสั่ง Paste
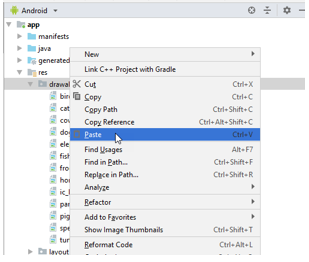
3. ระบบจะแสดงหน้าต่าง Copy ให้คลิกที่ปุ่ม OK
การนำไฟล์เสียง
หลังจากที่ได้นำเข้าไฟล์รูปภาพแล้ว ส่วนต่อไปเป็นการนำเข้าไฟล์เสียง ซึ่งมีลักษณะที่คล้ายคลึงกัน โดยมีขั้นต่อไปนี้
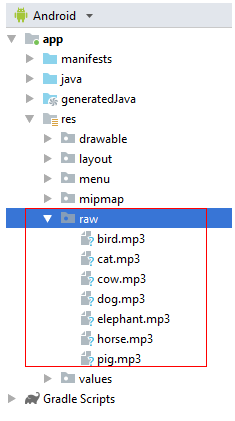
1.ไปยังที่เก็บไฟล์เสียงในคอมพิวเตอร์จากนั้นทำการคัดลอกรูปทั้งหมดที่เตรียมไว้ ให้คัดลอกมาทั้ง Folder ที่ชื่อว่า raw จากนั้งกับไปที่โปรแกรม เลือก app > res แล้วคลิกขวาเลือกคำสั่ง Paste จะแสดงหน้าต่างให้ Copy ให้คลิกปุ่ม OK (ชื่อ new name : ต้องกำหนดเป็น raw)
2. เมื่อนำเข้าไฟล์เสียงเสร็จสมบูรณ์ที่หน้าต่าง Project Explorer ก็จะแสดงไฟล์เสียง ภายใต้ raw
หลังจากที่ผู้อ่านได้สร้าง Projectแล้วนำเข้าไฟล์รูปภาพและเสียงแล้วส่วนต่อไปเป็นการสร้างส่วนปฏิสัมพันธ์กับผู้ใช้หรือ ui โดยมีหน้าจอหลักเป็นการใช้งานรูปภาพและเสียงที่สอดคล้องกันแล้วจากนั้นมีตัวเลือก 4 ข้อให้ผู้อ่านเลือกตอบจะมีขั้นตอนต่างๆดังต่อไปนี้
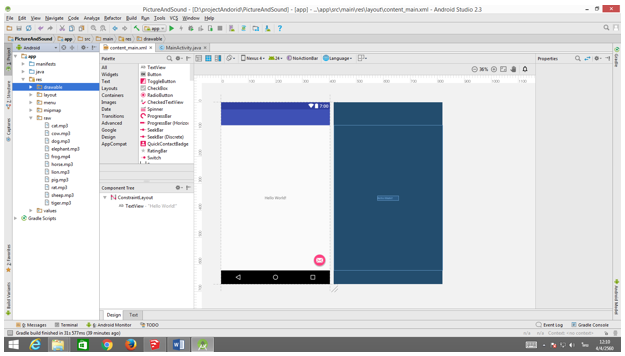
1. คลิกที่ Layout > เลือก Conten_main.xml
2. ให้ผู้อ่านเปลี่ยนรูปแบบในการออกแบบหน้าจอ Design เป็น Text
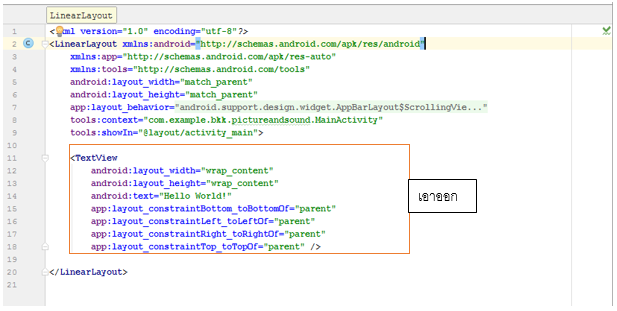
• ให้แก่ RalativeLayout เป็น LinearLayout
• ให้ลบ tag XML TextView
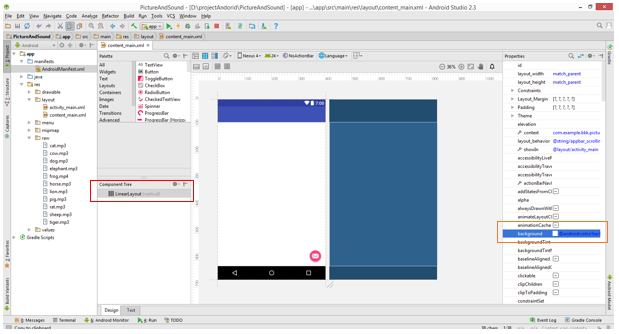
3. เลือก แทบ Design > component tree > เปลี่ยนค่า Orientation เป็น vertical , background เป็น #ffffffff
4. ที่หน้าจอให้สลับการออกแบบเป็นแนวนอนโดยคลิก  แล้วเลือก Landscape แล้วเลือก Landscape

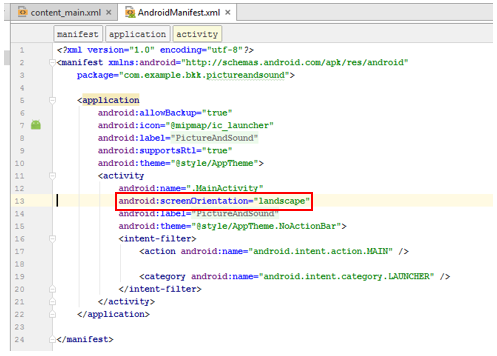
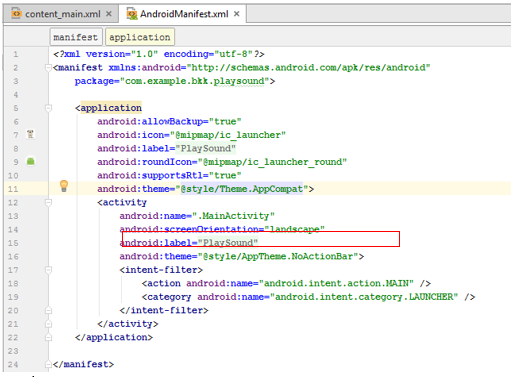
5. ตั้งค่า Activity MainActivity เป็นแนวนอนโดยคลิกที่ Project > app > manifests ดับเบิลคลิก Activity MainActivity ขึ้นมา จากนั้นเพิ่มโค้ด XML android : screenOrientation= ”landscape”
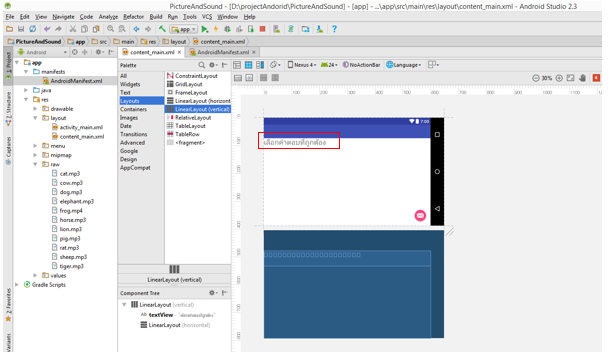
6. ที่ Project เลือกแท็บ content_main.xml เพื่อทำการแก้ไขไฟล์
7. ที่ Palette เลือก Widgets แล้วเลือก Text ลงมาวางที่หน้าต่าง Component Tree ภายใต้ LinearLayout เช่น TextView
8. ให้ดับเบิลคลิก แล้วเปลี่ยน text = เลื่อกคำตอบที่ถูกต้อง และ id = textview
9. ที่ Palette เลือก Layouts แล้วเลือก LinearLayout (Horizonatal)ลากวางที่หน้าต่าง Component Tree ภายใต้ LinearLayout
10. ที่หน้าต่าง Component Tree เลือก LinearLayout ที่หน้าต่าง Properties ตั้งค่า
• Layout:width = match_parent
• Layout:height=wrap_content
• Gravity = center_horizontal
11. ที่ Patette เลือก Widgets แล้วเลือก ImageView ลากวางที่หน้าต่าง Component Tree ภายใต้ LinearLayout
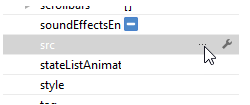
12. ที่หน้าต่าง Component Tree เลือก ImageView ที่หน้าต่าง Properties เมนู คลิกปุ่ม 
13. เลือกรูปภาพที่นำเข้าในตอนแรก ตัวอย่างเลือก cat คลิกปุ่ม OK
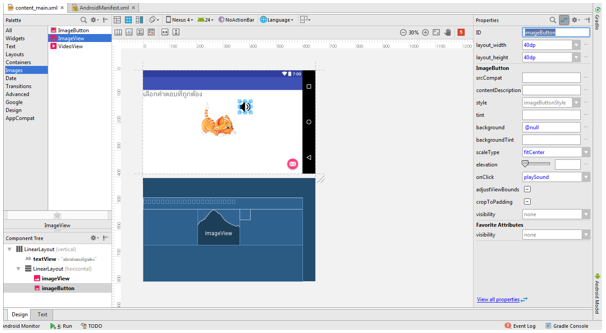
14. คลิกแท็บ Text แล้วใส่โค้ด XML ดังนี้

เพื่อทำให้โปรแกรมมีความสวยงามเพิ่มขึ้น ในส่วนนี้จะเป็นการเปลี่ยน ICON ที่ใช้ในการเปิดโปรแกรม โดยมีขึ้นตอนย่อยดังนี้
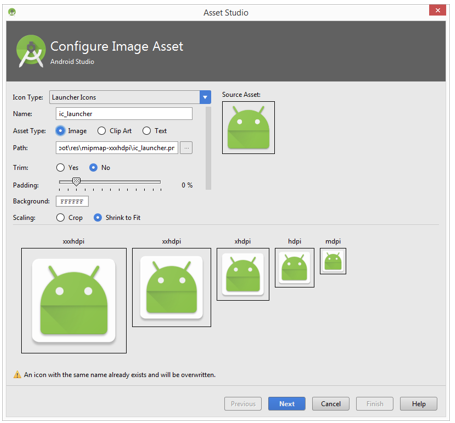
1. ที่ Project เลือก app > res แล้วคลิกขวาเลือก New > Image Asset
2. แสดงหน้าต่าง Asset Studio
• เลือก Asset Type เป็น Launcher Icon
• เลือก Foreground เป็น Images
• เลือก Images file โดยคลิกปุ่ม
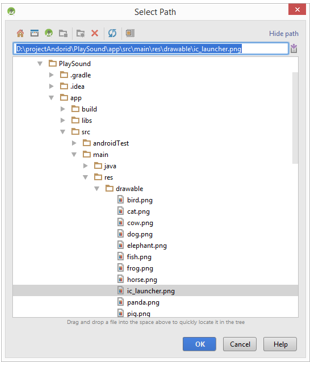
• หลังจากคลิกปุ่ม จะแสดงหน้าต่าง Select Path เลือกไฟล์ ic_launcher.png ที่ต้องการเปลี่ยน ICON สำหรับโปรแกรมนี้ ซึ่งในกรณีนี้จะอยู่ในโฟล์เดอร์ Resource แล้วคลิกปุ่ม OK

หลังจากที่ผู้อ่านได้สร้าง UI สำหรับโปรแกรมสื่อการสอนเบื้องต้น ส่วนต่อไปเป็นการพัฒนาโปรแกรมเพื่อที่จะเชื่อมต่อส่วนของ UI เข้ากับส่วนควบคุม โดยจะแก้ไขไฟล์ .java เป็นสำครัญ โดยมีขั้นตอนต่างๆ ดังต่อไปนี้
1. เลือก app > manifests แล้วดับเบิลคลิก Androidmanifests
2. ใส่โค้ดตามตัวอย่าง
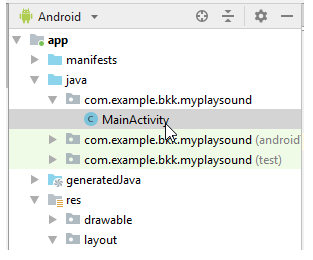
3. ที่ Project เลือก app > jave > com.example.bkk.myplaysound แล้วดับเบิลคลิก MainActivity
4. แก้ไขโค้ดไฟล์หลัก MainActivity.java ให้แก้ไขการ import ไฟล์ต่างๆ ดังรูปด้านล่าง แล้งจึงปรับ MainActivity เพื่อ extends ActionBarActivity
5. ให้สร้างตัวแปรต่างๆ เช่น
 • ปุ่มกด = Btch1 ถึง Btch4 • ปุ่มกด = Btch1 ถึง Btch4
• ปุ่มกดเสียง = Btspeaker
• รูปภาพ = Image
• จำนวนคำถาม = questionCount
• อาร์เรย์เก็บคำถาม = Idchoice
• คำตอบ = Answer
• คะแนน = score
• การเล่นเสียง = mPlayer
6. การแก้ไขโค้ด MainActivity.java ในส่วนของคลาส onCreate ให้มีการเชื่อมโยง XML กับ Java
• ปุ่ม Btch1 เชื่อมโยงกับตัวแปร Btch1
• ปุ่ม Btch2 เชื่อมโยงกับตัวแปร Btch2
• ปุ่ม Btch3 เชื่อมโยงกับตัวแปร Btch3
• ปุ่ม Btch4 เชื่อมโยงกับตัวแปร Btch4
• imageButton1 เชื่อมโยงกับตัวแปร Btspeaker
• imageView เชื่อมโยงกับตัวแปร Image
• เขียนโค้ดเพิ่มเพื่อวนรอบจำนวนข้อ ตั้งแต่ข้อ 1 ถึง QuestionCount คือ 5 แล้วเพิ่มในตัวแปร IDchoice (จำนวนคำถาม 5 ข้อ)
• เขียนโค้ดเพิ่มเพื่อเรียกฟังก์ชัน Collections.suffle หรือ ฟังก์ชันสุ่มสลับเปลี่ยนตำแหน่งข้อมูลตัวแปร IDchoice
• เขียนโค้นเพื่อเพิ่มเพื่อเรียกฟังก์ชัน setQuestion() จะเป็นการนำค่าที่เก็บไว้หลังสุด หรือ ค่าในตำแหน่งที่ 0 ออกจากตัวแปรอาร์เรย์ IDchoice ส่งออกไป
7. สร้างฟังก์ชันเพื่อเติม setQuestion() ซึ่งเป็นการรับคำถามและตัวแปรเก็บไว้ในอาร์เรีย์ IDchoice
• ถ้า IDchoice เท่ากับ 1 จะเก็บคำตอบในตัวแปร Answer เช่น นก
• ให้ตั้งค่าแสดงรูปภาพโจทย์ Image.setImageResource(R.drawable.bird); • ให้เก็บข้อมูลเสียงในตัวแปร mPlayer (R.raw.bird)
• ให้สร้างอาร์เรย์คำตอบเป็นตัวแปร choice โดยเก็บคำตอบที่เป็นไปได้ 4 ตัว เช่น นก ไก่ ช้าง ปลา
• ให้สุ่มสลับเปลี่ยนตำแหน่งข้อมูลในตัวแปร choice ด้วยฟังก์ชัน Collections.shuffle(choice);
• ให้แสดงค่าตัวเลือกที่ปุ่มทั้ง 4 ปุ่ม โดย pop ตัวแปรบนสุดของอาร์เรย์ Choice เช่น Btch1.setText(choicelremove(0));
8. ให้เขียนโค้ดเพิ่มเติมที่คล้ายคลึงกับข้อ (7) แต่เปลี่ยน IDchoice จาก 1 เป็น 2, 3, 4 และ 5
9. ให้สร้างฟังก์ชัน choiceAns() เพิ่มเติม สำหรับตรวจสอบความถูกต้องและเก็บคะแนน
• เมื่อกดปุ่มเลือกคำตอบ เรียกฟังก์ชัน choiceAns()
• เมื่อตรวจสอบคำตอบโดยดึงค่าตัวแปร Text บน Button (เรียกฟังก์ชัน b.getText();) มาเปรียบเทียบกับตัวแปรคำตอบ (Answer) ถ้าถูกต้องจะเพิ่มคะแนนโดย score++;
• เพื่อเป็นการตรวจสอบว่าตัวแปร Idchoice มีข้อมูลว่างหรือไม่ หรือถ้าเป็นเท็จจะเรียกฟังก์ชัน setQuestion() และทำโจทย์ข้อมต่อไป ถ้าเป็นจริงจะเรียกฟังก์ชัน DialogBox();
10. ให้สร้างฟังก์ชันเพิ่มเติม โดยเมื่อกดปุ่ม ImageButton จะเรียกฟังก์ชัน playSound() และเล่นเสียงเรียกใช้ mPlay)
11. ให้สร้างฟังก์ชัน DialogBox() เพิ่มเติม โดยเป็นฟังก์ชันแจ้งเตือน และแสดงคะแนนในตัวแปร score
• เมื่อกดปุ่ม Exit คือปิด Activity แล้วออกจากโปรแกรม
• เมื่อกดปุ่ม REPLAY จะ Restart Activity และเริ่มเปิดโปรแกรใหม่อีกครั้ง
12. เมื่อปรับแก้ไขโค้ดต่างๆ เรียบร้อยแล้ว จะมีความคล้ายคลึงกับโปรแกรมด้านล่าง
// --1 --
package com.example.bkk.playsound;
import android.os.Bundle;
import android.support.design.widget.FloatingActionButton;
import android.support.design.widget.Snackbar;
import android.support.v7.app.AppCompatActivity;
import android.support.v7.widget.Toolbar;
import android.view.View;
import android.view.Menu;
import android.view.MenuItem;
import android.app.AlertDialog;
import android.content.DialogInterface;
import android.content.Intent;
import android.media.MediaPlayer;
import android.widget.Button;
import android.widget.ImageButton;
import android.widget.ImageView;
import java.util.ArrayList;
import java.util.Collections;
public class MainActivity extends AppCompatActivity {
Button Btch1, Btch2, Btch3 , Btch4;
ImageButton Btspeaker;
ImageView Image;
int questionCount = 6;
ArrayList<Integer> IDchoice = new ArrayList<Integer>();
String Answer;
int score = 0;
MediaPlayer mPlayer;
@Override
protected void onCreate(Bundle savedInstanceState) {
super.onCreate(savedInstanceState);
setContentView(R.layout.activity_main);
Toolbar toolbar = (Toolbar) findViewById(R.id.toolbar);
setSupportActionBar(toolbar);
FloatingActionButton fab = (FloatingActionButton) findViewById(R.id.fab);
fab.setOnClickListener(new View.OnClickListener() {
@Override
public void onClick(View view) {
Snackbar.make(view, "Replace with your own action", Snackbar.LENGTH_LONG)
.setAction("Action", null).show();
}
});
// --5--
Btch1 =(Button) findViewById(R.id.Btch1);
Btch2 =(Button)findViewById(R.id.Btch2);
Btch3 = (Button)findViewById(R.id.Btch3);
Btch4 = (Button)findViewById(R.id.Btch4);
Btspeaker = (ImageButton)findViewById(R.id.imageButton);
Image = (ImageView)findViewById(R.id.imageView);
for (int i = 1; i <= questionCount; ++i)
IDchoice.add(i);
Collections.shuffle(IDchoice);
setQuetion(IDchoice.remove(0));
}
private void setQuetion(int IDchoice){
if (IDchoice == 1) {
Answer = "นก";
Image.setImageResource(R.drawable.bird);
mPlayer = MediaPlayer.create(this, R.raw.bird);
ArrayList<String> choice = new ArrayList<String>();
choice.add("นก");
choice.add("ไก่");
choice.add("ช่้าง");
choice.add("ปลา");
Collections.shuffle(choice);
Btch1.setText(choice.remove(0));
Btch2.setText(choice.remove(0));
Btch3.setText(choice.remove(0));
Btch4.setText(choice.remove(0));
}
if (IDchoice == 2) {
Answer = "แมว";
Image.setImageResource(R.drawable.cat);
mPlayer = MediaPlayer.create(this, R.raw.cat);
ArrayList<String> choice = new ArrayList<String>();
choice.add("แมว");
choice.add("สุนัข");
choice.add("วัว");
choice.add("หนู");
Collections.shuffle(choice);
Btch1.setText(choice.remove(0));
Btch2.setText(choice.remove(0));
Btch3.setText(choice.remove(0));
Btch4.setText(choice.remove(0));
}
if (IDchoice == 3) {
Answer = "วัว";
Image.setImageResource(R.drawable.cow);
mPlayer = MediaPlayer.create(this, R.raw.cow );
ArrayList<String> choice = new ArrayList<String>();
choice.add("วัว");
choice.add("แมว");
choice.add("นก");
choice.add("หนู");
Collections.shuffle(choice);
Btch1.setText(choice.remove(0));
Btch2.setText(choice.remove(0));
Btch3.setText(choice.remove(0));
Btch4.setText(choice.remove(0));
}
if (IDchoice == 4) {
Answer = "สุนัข";
Image.setImageResource(R.drawable.dog);
mPlayer = MediaPlayer.create(this, R.raw.dog);
ArrayList<String> choice = new ArrayList<String>();
choice.add("สุนัข");
choice.add("หมู");
choice.add("กา");
choice.add("หนู");
Collections.shuffle(choice);
Btch1.setText(choice.remove(0));
Btch2.setText(choice.remove(0));
Btch3.setText(choice.remove(0));
Btch4.setText(choice.remove(0));
}
if (IDchoice == 5) {
Answer = "ม้า";
Image.setImageResource(R.drawable.horse);
mPlayer = MediaPlayer.create(this, R.raw.horse);
ArrayList<String> choice = new ArrayList<String>();
choice.add("สุนัข");
choice.add("ม้า");
choice.add("แมว");
choice.add("กบ");
Collections.shuffle(choice);
Btch1.setText(choice.remove(0));
Btch2.setText(choice.remove(0));
Btch3.setText(choice.remove(0));
Btch4.setText(choice.remove(0));
}
if (IDchoice == 6) {
Answer = "ช้าง";
Image.setImageResource(R.drawable.elephant);
mPlayer = MediaPlayer.create(this, R.raw.elephant);
ArrayList<String> choice = new ArrayList<String>();
choice.add("วัว");
choice.add("ม้า");
choice.add("แมว");
choice.add("ช้าง");
Collections.shuffle(choice);
Btch1.setText(choice.remove(0));
Btch2.setText(choice.remove(0));
Btch3.setText(choice.remove(0));
Btch4.setText(choice.remove(0));
}
}
public void choiceAns(View v){
Button b = (Button) v;
String buttonText = b.getText().toString();
if (buttonText.equals(Answer)){
score++;
}
if(IDchoice.isEmpty()){
DialogBox();
}else{
setQuetion(IDchoice.remove(0));
}
}
public void playSound(View v){
mPlayer.start();
}
private void DialogBox(){
AlertDialog.Builder
builder = new AlertDialog.Builder(this) ;
builder.setTitle("แจ้งเตือน");
builder.setMessage("คุณได้คะแนน "+ score + " คะแนน")
.setCancelable(false)
.setPositiveButton("EXIT", new DialogInterface.OnClickListener() {
public void onClick(DialogInterface dialog, int id) {
finish();
}
})
.setNegativeButton("REPLAY", new DialogInterface.OnClickListener(){
public void onClick(DialogInterface dialog, int id){
Intent intent = getIntent();
finish();
startActivity(intent);
}
});
AlertDialog alert = builder.create();
alert.show();
}
@Override
public boolean onCreateOptionsMenu(Menu menu) {
// Inflate the menu; this adds items to the action bar if it is present.
getMenuInflater().inflate(R.menu.menu_main, menu);
return true;
}
@Override
public boolean onOptionsItemSelected(MenuItem item) {
int id = item.getItemId();
if (id == R.id.action_settings) {
return true; } return super.onOptionsItemSelected(item);
}
}
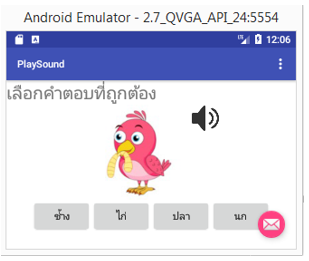
ทดลอง Run
|